
Trauma — MCQs

On this page
An adult trauma patient presents with severe respiratory distress, hypotension (BP 80/50), and distended neck veins. X given below. What is the immediate next step in management
According to ATLS guidelines, which of the following represents the correct sequence of steps in primary trauma management? Steps: a. Airway management with cervical spine protection b. Circulation with hemorrhage control c. Disability assessment d. Catastrophic bleeding control Which sequence is correct?
A trauma patient is evaluated using the GCS. The patient localizes to painful stimuli, produces incoherent sounds, and opens eyes only in response to pain. What is the total GCS score?
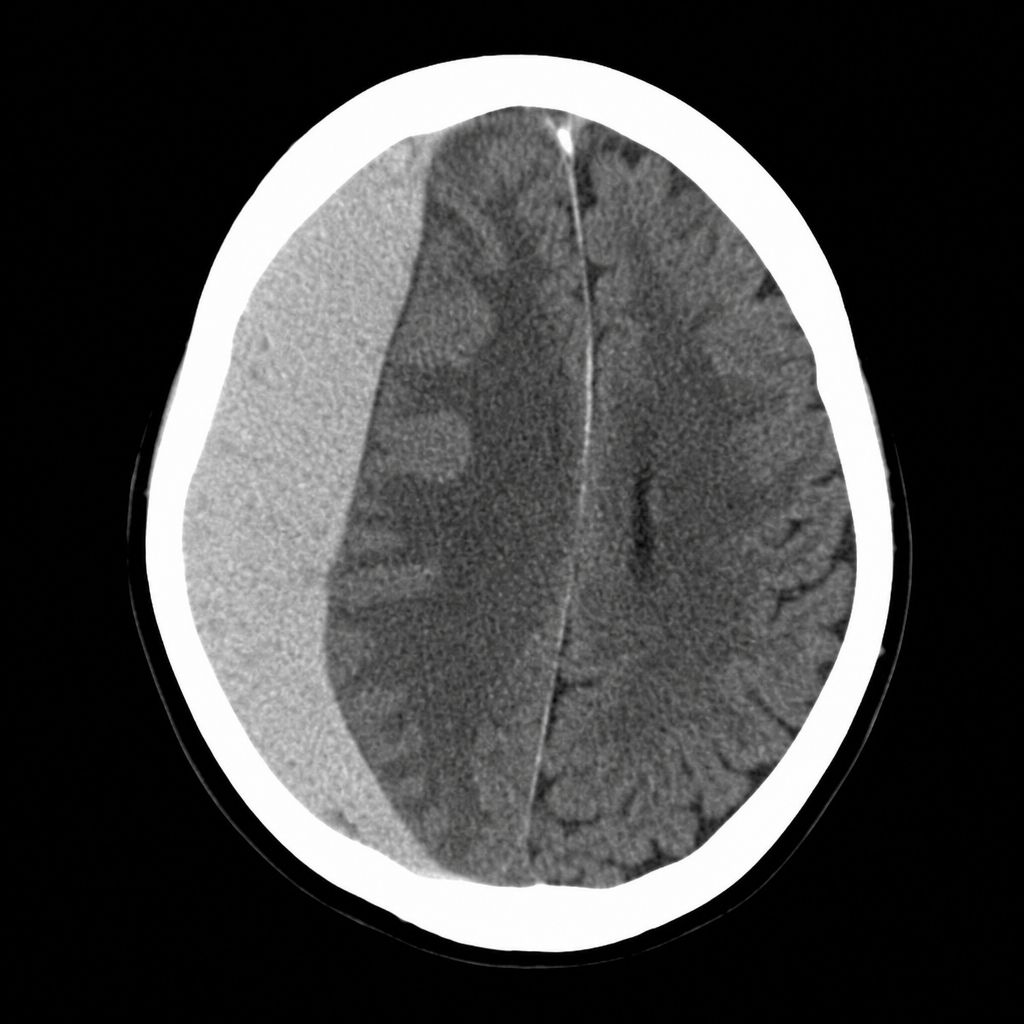
A 22-year-old male is brought to the emergency department after a road traffic accident. He had a brief loss of consciousness, followed by a lucid interval of approximately 2 hours, and has now become increasingly drowsy with a GCS of 10. A non-contrast CT of the brain is shown in Image 4. Which of the following vessels is most commonly responsible for this type of intracranial collection?
A 19-year-old man is admitted to the emergency room following a motorcycle accident. He is alert and fully oriented, but witnesses to the accident report an interval of unresponsiveness following the injury. Skull films show a fracture of the left temporal bone. Following x-ray, the patient suddenly loses consciousness and dilation of the left pupil is noted. What condition should this patient be considered to have?
A 65-year-old man presents after a motor vehicle accident with a blood pressure of 150/90 mm Hg and a pulse of 120 bpm. He has deformity below the left knee with no palpable distal pulses. Radiographs reveal proximal tibia and fibula fractures. What is the next step in management?
A 60-year-old man presents to the emergency department after being hit by a pickup truck with a blood pressure of 70/0 mm Hg. Initial peritoneal lavage showed no blood in the abdomen. Following the administration of 2 L of Ringer's lactate, his blood pressure increased to 85 mm Hg systolic. An x-ray revealed a pelvic fracture. What is the next step in management?
What is the primary purpose of the FAST examination?
An elderly female presented with a history of progressive right-sided weakness and speech difficulty. She reports a fall in her bathroom two months prior. What is the most likely clinical diagnosis?
The triad of bulbar urethral injury includes all except?
Practice by Chapter
Initial Assessment of Trauma Patient
Practice Questions
Advanced Trauma Life Support (ATLS) Principles
Practice Questions
Chest Trauma
Practice Questions
Abdominal Trauma
Practice Questions
Head Trauma
Practice Questions
Spinal Trauma
Practice Questions
Extremity Trauma
Practice Questions
Vascular Trauma
Practice Questions
Genitourinary Trauma
Practice Questions
Burns Management
Practice Questions
Mass Casualty Management
Practice Questions
Damage Control Surgery
Practice Questions
Want unlimited practice?
Get full access to all questions, explanations, and performance tracking.
Scan to download app