When Class III elastics are used, what movement will the maxillary first molars exhibit?
A high crural index is typically observed in which of the following groups?
Which posture is associated with the greatest lumbar intradiscal pressure?
Which of the following muscles is primarily responsible for generating propulsive force during the push-off phase of normal gait?
What is the primary dynamic stabilizer of the patella against the lateral pull of the vastus lateralis?
What is the mechanical advantage obtained from the wheel and axle principle of an elevator?
In the mandibular symphysis region, which additional forces are present that are not usually seen in the body, ramus, or condylar regions?
The following gait is seen due to weakness of:

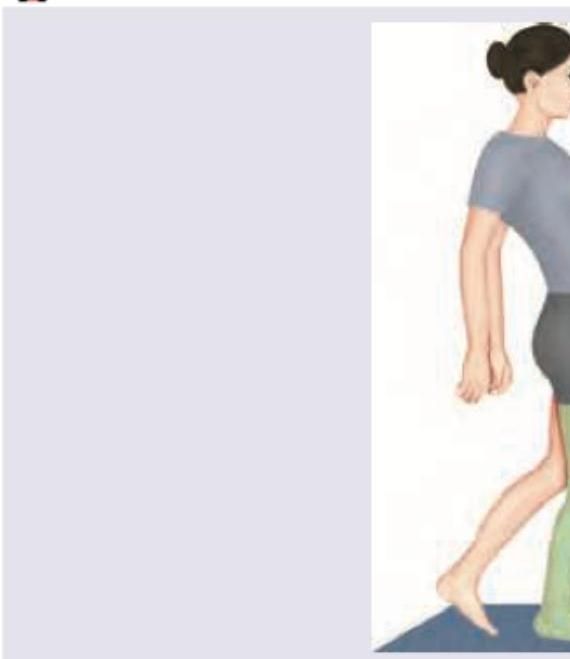
The following gait is due to weakness of:

Defect in Gluteus Maximus lead to all of the following, EXCEPT:
Explanation: **Explanation:** In orthodontic biomechanics, the direction of force determines the displacement of teeth. **Class III elastics** are stretched from the **mandibular anterior region** (usually the canines) to the **maxillary posterior region** (usually the first molars). **1. Why Option B is correct:** The force vector of a Class III elastic on the maxillary molar acts in a **downward and forward** direction. * **Mesial Movement:** The horizontal component of the force pulls the maxillary molar forward (mesially). * **Extrusion:** Because the elastic is attached to the lower arch (which is inferior to the maxilla), the vertical component of the force pulls the molar downward, leading to extrusion. **2. Why the other options are incorrect:** * **Option A & C:** Distal movement is characteristic of **Class II elastics**, where the force pulls the maxillary teeth backward. Intrusion would require a superiorly directed force (like a high-pull headgear), which elastics do not provide to the maxillary molars. * **Option D:** This ignores the vertical vector. In clinical practice, elastics rarely exert a purely horizontal force; the "line of action" always creates a vertical component that results in either extrusion or intrusion. **Clinical Pearls for NEET-PG:** * **Class II Elastics:** Cause **distalization and extrusion** of maxillary incisors/molars and **mesialization and extrusion** of mandibular molars. * **Side Effects:** A common side effect of Class III elastics is the steepening of the occlusal plane and a potential increase in the lower anterior facial height due to molar extrusion. * **Center of Resistance:** If the force does not pass through the center of resistance, rotation (tipping) will occur alongside translation.
Explanation: **Explanation:** The **Crural Index** is a biomechanical ratio used to describe the proportions of the lower limb. It is calculated as: **Crural Index = (Length of Tibia / Length of Femur) × 100** **1. Why Jumping Athletes is Correct:** A high crural index indicates a **longer tibia relative to the femur**. From a biomechanical standpoint, a longer distal segment (tibia) increases the "lever arm" of the lower limb. In jumping athletes (such as high jumpers or basketball players), this anatomical advantage allows for a faster rate of limb extension and greater velocity at the foot during takeoff. This "long-lever" system is more efficient for explosive power and vertical displacement. **2. Analysis of Incorrect Options:** * **Gymnasts:** Typically have a lower crural index and shorter stature. This provides a lower center of gravity and a smaller moment of inertia, which is advantageous for rotational stability and balance. * **Weight lifters:** Benefit from shorter limbs (lower crural index) because shorter levers reduce the torque required to lift heavy loads, providing a mechanical advantage for strength over speed. * **Long-distance runners:** While they often have lean limbs, they do not necessarily require the extreme distal elongation seen in explosive jumpers; their biomechanics favor metabolic efficiency over maximum vertical power. **3. Clinical Pearls for NEET-PG:** * **Evolutionary Note:** High crural indices are often seen in populations adapted to hot climates (to increase surface area for heat dissipation) and in cursorial (running/jumping) animals. * **Brachial Index:** A similar ratio for the upper limb (Radius length / Humerus length × 100). * **High-Yield Fact:** In orthopedics, limb length ratios are crucial for gait analysis and prosthetic design. A higher crural index generally correlates with a higher center of mass, which is beneficial for high-velocity movements.
Explanation: This question is based on the classic biomechanical studies by **Nachemson**, which measured intradiscal pressure at the L3-L4 level in various positions. ### **Explanation** The intradiscal pressure is determined by the combination of **superincumbent body weight** and **muscle activity** required to maintain balance. 1. **Sitting vs. Standing:** When sitting, the pelvis tilts posteriorly, and the normal lumbar lordosis is flattened. This increases the lever arm of the upper body weight, requiring greater back muscle contraction to maintain the posture, which significantly increases the load on the discs compared to standing. 2. **Flexion vs. Extension:** Flexion (leaning forward) shifts the center of gravity further forward. This creates a large **flexion moment**, forcing the posterior spinal muscles and ligaments to exert a massive counter-traction force to prevent the trunk from falling. This "pincer effect" compresses the disc severely. Therefore, **Sitting with trunk flexed (Option A)** combines the high baseline pressure of sitting with the added mechanical disadvantage of flexion, resulting in the highest intradiscal pressure (approx. 185-200% of standing pressure). ### **Analysis of Other Options** * **B. Sitting with trunk erect:** While higher than standing, the vertical alignment reduces the flexion moment compared to leaning forward. * **C. Standing with trunk flexed:** Pressure is high (approx. 150%), but the lower limbs and pelvis help absorb some load that is otherwise transmitted directly to the spine when sitting. * **D. Standing with trunk erect:** This is used as the baseline (100%). The weight is distributed through the vertebral bodies and facets. ### **High-Yield Clinical Pearls for NEET-PG** * **Lowest Pressure:** **Supine (lying flat)** has the lowest intradiscal pressure (approx. 25%). * **Highest Overall Pressure:** Sitting or standing while **flexed and lifting a weight** (e.g., lifting a bucket) produces the absolute maximum pressure. * **Coughing/Straining:** These maneuvers significantly increase intradiscal pressure due to the Valsalva effect. * **Clinical Application:** Patients with acute disc prolapse are advised to avoid sitting and forward bending to minimize the risk of further herniation.
Explanation: **Explanation:** The **push-off phase** (late stance) of the gait cycle requires a powerful plantarflexion force to propel the body forward and upward. 1. **Why Gastrocnemius is correct:** The **Gastrocnemius** and Soleus (together forming the Triceps Surae) are the primary plantarflexors of the ankle. During the "terminal stance" and "pre-swing" phases, the Gastrocnemius undergoes a powerful concentric contraction. This provides the necessary **propulsive force** to lift the heel off the ground and accelerate the center of mass forward. 2. **Why the other options are incorrect:** * **Popliteus:** Known as the "Key to the knee," its primary role is to unlock the knee by laterally rotating the femur on the fixed tibia to initiate flexion. It does not contribute to propulsion. * **Tibialis Anterior:** This is the primary **dorsiflexor** of the foot. It is most active during the "swing phase" (for foot clearance) and at "heel strike" (to control the lowering of the foot via eccentric contraction). * **Iliopsoas:** This is a powerful hip flexor. While it helps initiate the swing phase by pulling the thigh forward, it is not the primary generator of the distal propulsive force seen in push-off. **High-Yield Clinical Pearls for NEET-PG:** * **Gait Cycle:** Stance phase constitutes 60% and Swing phase 40% of the cycle. * **Trendelenburg Gait:** Caused by weakness of the Gluteus Medius (hip abductor). * **Foot Drop:** Result of Tibialis Anterior paralysis (Common Peroneal Nerve injury), leading to a "High Steppage Gait." * **Calf Muscle Rupture:** Often referred to as "Tennis Leg," involving the medial head of the Gastrocnemius.
Explanation: ### Explanation The patella is naturally predisposed to lateral displacement due to the **Q-angle**, which creates a lateral vector force during quadriceps contraction. To counteract this, the body employs both static and dynamic stabilizers. **Why Vastus Medialis Obliquus (VMO) is correct:** The **Vastus Medialis Obliquus (VMO)** is the most important **dynamic stabilizer** of the patella. Unlike the Vastus Medialis Longus (VML), which contributes to knee extension, the fibers of the VMO are oriented at an angle of approximately 50–55 degrees. This horizontal orientation allows it to pull the patella medially during the final degrees of extension, directly opposing the lateral pull of the vastus lateralis. **Analysis of Incorrect Options:** * **Vastus Medialis Longus (VML):** While part of the same muscle group, its fibers are longitudinal. Its primary function is knee extension, not medial stabilization. * **Medial Patellofemoral Ligament (MPFL):** This is the primary **static stabilizer** (contributing ~60% of restraint against lateral displacement). The question specifically asks for a *dynamic* (muscular) stabilizer. * **Trochlear Depth:** This is a **geometric/osseous stabilizer**. A shallow trochlea (trochlear dysplasia) predisposes to instability, but it is not a dynamic force. **High-Yield Clinical Pearls for NEET-PG:** * **Primary Static Stabilizer:** MPFL (most commonly torn in acute patellar dislocations). * **Primary Dynamic Stabilizer:** VMO. * **"Screw Home" Mechanism:** Occurs in the last 20° of extension; VMO deficiency often leads to patellofemoral pain syndrome (PFPS) in this range. * **Patellar Tracking:** Influenced by the Q-angle; an increased Q-angle (common in females) increases the risk of lateral subluxation.
Explanation: **Explanation:** The **wheel and axle principle** is a fundamental concept in orthopedic biomechanics, particularly in the design of surgical instruments like **elevators** (e.g., Periosteal or Coupland elevators). This principle states that a small force applied to a large diameter (the handle/wheel) produces a much larger force at the smaller diameter (the shank/axle). **1. Why 4.6 is the correct answer:** The Mechanical Advantage (MA) of a wheel and axle is calculated by the ratio of the radius of the wheel (R) to the radius of the axle (r): **MA = R / r**. In standard orthopedic elevators, the handle is designed to be significantly wider than the working tip. Biomechanical studies and standard engineering specifications for these surgical tools establish that the ratio of the handle's radius to the shank's radius typically yields a mechanical advantage of approximately **4.6**. This allows the surgeon to exert significant torque to lift periosteum or luxate a bone/tooth with minimal manual effort. **2. Analysis of incorrect options:** * **A (2.5) and B (3):** These values are too low for standard surgical elevators. While they represent a mechanical advantage, they do not reflect the specific design efficiency required to overcome the high resistance of cortical bone or tough periosteal attachments. * **D (6):** While a higher MA is theoretically possible with a much thicker handle, a value of 6 would make the instrument too bulky for ergonomic surgical use and might lead to excessive force that could inadvertently fracture the bone. **Clinical Pearls for NEET-PG:** * **Three Principles of Elevators:** Elevators work on three biomechanical principles: **Lever principle** (most common), **Wedge principle**, and **Wheel and Axle principle**. * **Lever Principle:** Most elevators act as Class I levers (Effort-Fulcrum-Load). * **High-Yield Fact:** The "Wheel and Axle" effect is specifically utilized when the elevator is **rotated** around its long axis to lift a structure, whereas the "Lever" effect is used when the handle is **depressed** to lift the tip.
Explanation: **Explanation:** The mandibular symphysis is the midline junction of the two halves of the mandible. Unlike the body or ramus, which primarily experience linear bending forces, the symphysis is subjected to unique biomechanical stresses due to the "U-shaped" geometry of the mandible. **Why Torsion is Correct:** When the mouth opens or during unilateral loading (chewing on one side), the lateral pterygoid muscles pull the condyles medially. This causes the lower borders of the mandibular rami to flare outward while the superior borders move inward. This twisting motion around the long axis of the mandibular body meets at the midline, resulting in **torsional (twisting) forces** at the symphysis. This is why symphyseal fractures often require two points of fixation (e.g., two miniplates) to counteract these rotational forces. **Analysis of Incorrect Options:** * **A. Tension:** Tension occurs at the superior border (alveolar margin) of the mandible during function. It is common to all regions of the mandible. * **B. Compression:** Compression occurs at the inferior border of the mandible during loading. Like tension, it is a standard force found throughout the mandibular body. * **C. Shearing:** While shearing forces can occur during trauma, they are not the characteristic functional biomechanical force unique to the symphysis compared to other regions. **High-Yield NEET-PG Pearls:** * **Champy’s Lines of Osteosynthesis:** These are the ideal lines for plate placement to counteract tension. In the symphysis, two plates are needed to neutralize **torsion**. * **Tension vs. Compression:** In the mandible, the superior border is the tension zone, and the inferior border is the compression zone. * **Stress Distribution:** The symphysis is the thickest part of the mandible (mentum), yet it is a common site for fractures due to its prominent position and the concentration of torsional stress.
Explanation: ***Gluteus medius*** - Weakness of the **gluteus medius** leads to a **Trendelenburg gait**, where the pelvis drops on the unsupported side during the swing phase of gait. - The image suggests pelvic tilting, which is characteristic of the body attempting to compensate for the inability of the gluteus medius to stabilize the pelvis. *Gluteus maximus* - Weakness of the gluteus maximus causes difficulty in **hip extension**, resulting in a **lurching gait** where the trunk is thrown backward at heel strike. - This is commonly known as a **gluteus maximus lurch**, which is not depicted in an obvious manner here. *Psoas major* - Weakness of the psoas major would primarily affect **hip flexion**, making it difficult to lift the leg off the ground (e.g., during the swing phase). - This would result in compensatory movements such as circumduction or hiking the hip, rather than the characteristic pelvic drop. *Tibialis anterior* - Weakness of the tibialis anterior causes **foot drop**, leading to a **steppage gait** where the knee is lifted high to avoid dragging the foot. - The image does not show a foot drop or high stepping, thus ruling out tibialis anterior weakness.
Explanation: **Gluteus medius** - The image depicts a **Trendelenburg gait**, where the pelvis drops on the unsupported side (**swing phase**) due to weakness of the **contralateral gluteus medius** (on the stance leg). - The gluteus medius is crucial for **stabilizing the pelvis** during single-leg stance by abducting the hip and preventing the opposite hip from dropping. *Gluteus maximus* - Weakness of the gluteus maximus primarily causes difficulty with hip extension, leading to a **lurching backward gait** to maintain an upright posture. - It does not directly cause the classic pelvic drop observed in the Trendelenburg gait. *Psoas major* - The psoas major is a primary hip flexor; weakness would cause difficulty lifting the leg forward, resulting in a **waddling gait** or **inability to flex the hip**. - It is not directly responsible for stabilizing the pelvis laterally during locomotion. *Tibialis anterior* - Weakness of the tibialis anterior causes **foot drop**, leading to a **steppage gait** where the leg is lifted high to clear the foot off the ground. - This muscle is involved in dorsiflexion of the ankle, not in hip stability or pelvic drop.
Explanation: ***Positive Trendelenburg's sign*** - A positive Trendelenburg's sign indicates weakness of the **gluteus medius** and **minimus** muscles, which are primarily responsible for abducting the hip and stabilizing the pelvis during gait. - A defect in the **gluteus maximus** does not directly cause this sign, as its main function is hip extension. *Extension defect* - The **gluteus maximus** is the primary extensor of the hip joint. - A defect in this muscle would indeed lead to difficulty or weakness in performing **hip extension**. *Difficulty in straightening from the bending position* - Straightening from a bending position requires powerful **hip extension**, which is a primary function of the **gluteus maximus**. - Without a functional gluteus maximus, this movement would be significantly impaired. *Difficulty rising from the sitting position* - Rising from a sitting position involves strong **hip extension** and **knee extension**, with the gluteus maximus being crucial for the hip component. - A defect would make this everyday activity much more challenging.
Principles of Biomechanics
Practice Questions
Biomechanics of Fracture Fixation
Practice Questions
Biomechanics of Spine
Practice Questions
Biomechanics of Hip
Practice Questions
Biomechanics of Knee
Practice Questions
Biomechanics of Foot and Ankle
Practice Questions
Biomechanics of Upper Limb
Practice Questions
Gait Analysis
Practice Questions
Biomechanics of Arthroplasty
Practice Questions
Biomechanics of Sports Injuries
Practice Questions
Computational Modeling in Orthopaedics
Practice Questions
Clinical Applications of Biomechanics
Practice Questions
Get full access to all questions, explanations, and performance tracking.
Start For Free