Back
USMLE Step 1 Anatomy: How to Use Mnemonics and Probe Game for Faster Recall
Master USMLE Step 1 anatomy using mnemonics and active recall games. Learn brachial plexus, cranial nerves, and spinal tracts with memory techniques that build exam-ready recall speed.

USMLE Step 1 Anatomy: How to Use Mnemonics and Probe Game for Faster Recall
You are probably looking at your anatomy review schedule right now, wondering how you'll memorize cranial nerve pathways, brachial plexus branches, and spinal tract locations without your brain exploding. Here's the thing: rereading Gray's Anatomy for the fifth time won't help you recall nerve root values under exam pressure. You need active recall loops.
USMLE Step 1 has roughly 35-42 anatomy questions per exam. That's 12-15% of your total score, concentrated in high-yield areas like neuroanatomy (8-12 questions), cardiovascular anatomy (6-8 questions), and embryology patterns (4-6 questions). The students who nail anatomy aren't the ones with perfect textbook knowledge — they're the ones who can rapidly retrieve brachial plexus nerve roots, identify cranial nerve lesions from clinical vignettes, and spot spinal tract syndromes in 90 seconds.
The difference? They convert dense anatomy lists into memorable recall cues, then test themselves repeatedly until recognition becomes automatic. Instead of passive diagram review, they use mnemonics to encode high-yield facts and play rapid-fire games to identify weak spots before exam day.
This guide shows you exactly how to transform your anatomy review using memory techniques and active recall games that mirror Step 1's question style.
Why Traditional Anatomy Study Falls Short for USMLE
Most students approach anatomy like they're memorizing an atlas. They highlight diagrams, reread nerve pathways, and hope repetition will stick. But Step 1 doesn't test you on perfect anatomical drawings — it tests your ability to recognize structures and lesions from incomplete clinical information.
The problem with passive review:
Recognition isn't recall. You might recognize the median nerve in a labeled diagram but freeze when a Step 1 vignette describes "weakness in thumb opposition with preserved wrist flexion." That's active recall under pressure, and passive study doesn't prepare you for it. Lists get jumbled. When you passively read "C5-C6-C7-C8-T1," your brain files it as one blur. But when you actively retrieve brachial plexus nerve roots using mnemonics like "Come Let's Drink Cold Beer" (C5-C6 = lateral cord, C7 = posterior cord, C8-T1 = medial cord), each component becomes a distinct memory anchor. No feedback loop. Passive reading gives you the illusion of knowing. You think you understand cranial nerve functions until you try explaining CN VII branches from memory and realize you can't distinguish the chorda tympani from the stylomastoid foramen pathway.
The Active Recall Approach to USMLE Step 1 Anatomy
Active recall means forcing yourself to retrieve anatomy facts without looking at references. Instead of highlighting nerve pathways, you quiz yourself: "Which nerve roots form the brachial plexus? What does C5-C6 injury look like clinically?" Then check your answer and identify gaps.
This approach works because retrieval practice strengthens neural pathways more than passive recognition. When you actively reconstruct the Circle of Willis from memory, you're building the same recall patterns you'll need during the actual exam.
Turn lists into testable chunks. Break complex anatomy into bite-sized recall units. Instead of "learn all cranial nerves," focus on "CN III, IV, VI eye movement patterns" or "CN V sensory divisions with landmarks." Use clinical correlations as memory hooks. Pure anatomical facts fade quickly, but clinical patterns stick. When you learn that C5-C6 nerve root injury causes "waiter's tip posture," you're linking anatomy to a visual pattern that's harder to forget. Test recall speed, not just accuracy. Step 1 gives you roughly 90 seconds per question. Practice retrieving anatomy facts quickly — if you can't recall brachial plexus branches in 30 seconds, you need more active drilling.
High-Yield Mnemonics for USMLE Step 1 Anatomy
Mnemonics convert complex anatomy lists into memorable patterns. The key is choosing mnemonics that create distinct, visual associations rather than just sound-alike words.
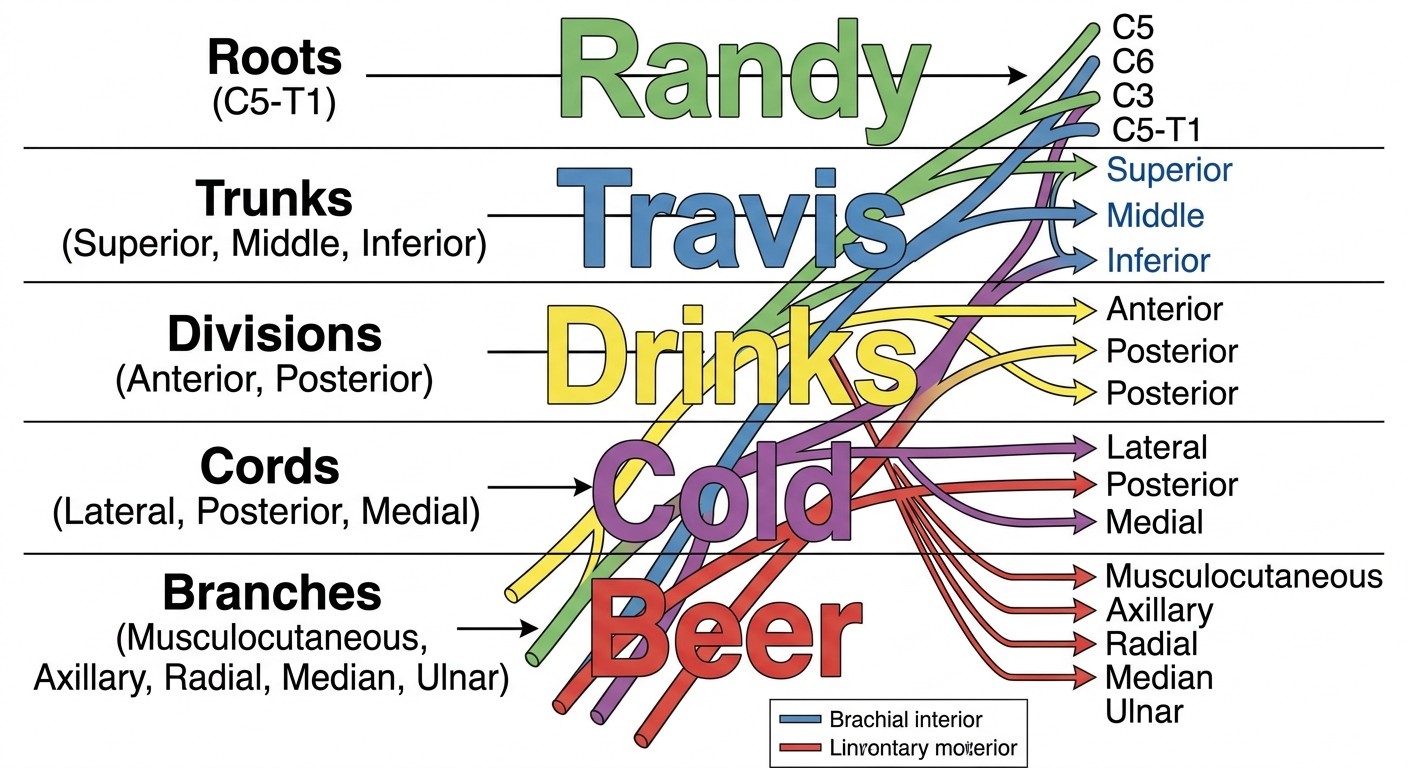
Brachial Plexus Organization
"Randy Travis Drinks Cold Beer" maps the five-level organization:
Randy = Roots (C5-C6-C7-C8-T1)
Travis = Trunks (upper, middle, lower)
Drinks = Divisions (anterior, posterior from each trunk)
Cold = Cords (lateral, posterior, medial)
Beer = Branches (terminal nerves)
For nerve root remember ation, "Come Let's Drink Cold Beer" helps with cord formation:
Come Let's = C5-C6 + C7 anterior divisions → lateral cord
Drink = All posterior divisions → posterior cord
Cold Beer = C8-T1 anterior division → medial cord
This creates a testable pattern. When you see a brachial plexus question, you can rapidly work through Randy Travis to identify the level of injury, then use cord mnemonics to predict which nerves are affected. Oncourse mnemonics feature helps you add these memory cues directly to your flashcards, turning dense anatomy lists into memorable recall hooks that you can test immediately.
Cranial Nerve Functions
"Some Say Marry Money But My Brother Says Big Brains Matter More" covers cranial nerve types:
S-S = CN I, II (sensory)
M = CN III (motor)
M = CN IV (motor)
B = CN V (both)
M = CN VI (motor)
B = CN VII (both)
S = CN VIII (sensory)
B = CN IX (both)
B = CN X (both)
M = CN XI (motor)
M = CN XII (motor)
Spinal Cord Tract Locations
"Dorsals Like Fine Touch, Laterals Like Pain":
Dorsal columns = fine touch, vibration, proprioception (gracile and cuneate)
Lateral spinothalamic = pain and temperature
Anterior spinothalamic = crude touch
For corticospinal tract lesions: "Upper Motor Neuron = Spastic, Lower Motor Neuron = Flaccid" with the clinical pattern that UMN lesions cause hyperreflexia and spasticity, while LMN lesions cause hyporeflexia and fasciculations.
Foramina and Their Contents
"Standing Room Only" for foramen ovale contents:
S = Sphenoid bone location
R = CN V₃ (mandibular nerve)
O = Otic ganglion nearby
"I See All" for superior orbital fissure:
I = CN III (oculomotor)
S = CN IV (trochlear), CN VI (abducens), CN V₁ (ophthalmic)
A = Superior and inferior divisions of oculomotor nerve
All = All pass through the superior orbital fissure
Using Probe Game for Rapid Anatomy Recall
While mnemonics help you encode anatomy facts, you need rapid retrieval practice to identify weak spots and build exam-ready recall speed. This is where game-based recall becomes crucial.
Oncourse Probe Game generates rapid-fire anatomy challenges using layered clues that mirror how Step 1 presents information. Instead of seeing labeled diagrams, you get clinical descriptions like "patient presents with wrist drop and weakness in thumb extension" and need to identify the affected nerve quickly.
The game works by presenting anatomy terms through progressive hints:
First clue: Clinical presentation ("weakness in wrist extension")
Second clue: Anatomical location ("nerve in spiral groove")
Third clue: Additional features ("Saturday night palsy pattern")
Answer: Radial nerve
This matches Step 1's style perfectly. Questions rarely give you direct anatomical labels — they describe clinical scenarios and expect you to work backward to identify the involved structures.
Daily recall rounds: Instead of rereading brachial plexus diagrams, run 5-minute Probe sessions focusing on upper limb anatomy. The game tracks which terms you identify quickly versus which ones require multiple clues, highlighting exactly where your recall breaks down. Streak tracking: The game maintains daily attempt streaks and performance metrics, turning anatomy review into consistent practice rather than cramming sessions. When you can identify radial nerve patterns, median nerve territories, and ulnar nerve deficits within the first clue consistently, you're building exam-ready recall speed.
Converting Passive Study Materials Into Active Recall
Most anatomy resources are designed for passive consumption. Here's how to convert them into active recall tools:
Transform Textbook Lists Into Testable Flashcards
Instead of reading "The median nerve innervates thenar muscles except adductor pollicis," create two-sided flashcards:
Front: "Which nerve innervates thenar muscles? What's the exception?" Back: "Median nerve. Exception: adductor pollicis (ulnar nerve)"
Then add clinical correlation: "Median nerve injury → inability to oppose thumb, but can still adduct (ulnar preserved)"
Oncourse Synapses flashcards system schedules these anatomy facts for spaced review, so high-yield details like nerve innervation patterns come back for reinforcement instead of being forgotten after one pass.
Create Clinical Scenario Practice
Turn pure anatomy into clinical reasoning:
Instead of: "Cranial nerve VII has two divisions" Practice with: "Patient has facial weakness but can close eyes. Which CN VII branch is affected?" Instead of: "Spinal cord has ascending and descending tracts" Practice with: "Patient loses pain sensation but retains fine touch on right side. Which tract and at what level?"
Build Progressive Difficulty Chains
Start with basic identification, then layer complexity:
Level 1: Name the nerve roots of brachial plexus Level 2: Identify which nerve forms from which cord Level 3: Predict clinical deficits from specific nerve injuries Level 4: Distinguish between upper trunk vs lower trunk vs specific nerve lesions
Neuroanatomy: Your Highest-Yield Focus Area
Neuroanatomy generates 8-12 questions per USMLE Step 1 exam — more than any other anatomy system. Focus your mnemonic and recall practice here for maximum score impact.
Brain Blood Supply Patterns
Circle of Willis organization: "A1-ACA, A2-ACA, M1-MCA, M2-MCA, P1-PCA, P2-PCA" with stroke syndrome correlations:
ACA stroke = Lower extremity weakness, personality changes
MCA stroke = Upper extremity weakness, aphasia (dominant hemisphere)
PCA stroke = Visual field deficits, memory problems
Cranial Nerve Clinical Patterns
Focus on the nerves with clear clinical correlations that appear frequently on Step 1:
CN III lesions: Complete ptosis, eye "down and out," pupil dilation. Distinguish between compressive (pupil involved) vs ischemic (pupil spared) causes. CN VII lesions: Upper motor neuron (forehead spared) vs lower motor neuron (complete facial paralysis). The key clinical distinction that appears repeatedly. CN X lesions: Uvula deviation away from lesion side, hoarseness, difficulty swallowing.
When you encounter these patterns in Probe Game scenarios, you're practicing the exact type of clinical reasoning Step 1 tests.
Spinal Cord Tract Syndromes
Brown-Séquard syndrome: Ipsilateral motor loss and proprioception loss, contralateral pain and temperature loss. Remember as "Same side moves, opposite side feels pain." Central cord syndrome: "Cape-like" sensory loss over shoulders and upper extremities due to spinothalamic tract involvement at the central cord level. Anterior cord syndrome: Motor loss and pain/temperature loss with preserved proprioception and fine touch (dorsal columns spared).
Building Your Daily Anatomy Recall Routine
Consistent daily practice beats intensive cramming sessions. Here's a sustainable routine that builds long-term retention:
Morning Recall Session (15 minutes)
Start each study day with rapid anatomy retrieval:
5 minutes: Brachial plexus nerve root quiz (no references)
5 minutes: Cranial nerve function rapid-fire
5 minutes: Spinal tract location and function review
Use Probe Game for this session — the rapid clue format matches the time pressure you'll face on exam day.
Study Block Integration
When reviewing each organ system, dedicate 20% of your time to anatomy integration:
Cardiology block: Focus on coronary artery anatomy, cardiac innervation, and great vessel relationships Pulmonology block: Master bronchial tree branching, lung segment anatomy, and diaphragmatic innervation Nephrology block: Know renal blood supply, ureter course, and bladder innervation
Weekly Comprehensive Review
Every Sunday, run comprehensive anatomy recall sessions covering all major systems. Track which areas require multiple clues in Probe Game — these become your focus areas for the following week.
Use anatomy flashcards to space out high-yield facts across time, ensuring that complex pathways like Circle of Willis branches and brachial plexus organization don't fade between study sessions.
Clinical Integration: Connecting Anatomy to Step 1 Vignettes
Step 1 anatomy questions embed anatomical concepts within clinical scenarios. Master these common integration patterns:
Weakness Patterns and Nerve Localization
Erb-Duchenne palsy (C5-C6 injury): "Waiter's tip" posture — shoulder adducted, elbow extended, forearm pronated, wrist flexed Klumpke palsy (C8-T1 injury): "Claw hand" — weakness in intrinsic hand muscles Saturday night palsy (radial nerve): Wrist drop with preserved triceps function
Sensory Loss Patterns
Carpal tunnel syndrome: Median nerve compression → numbness in thumb, index, middle finger, and radial half of ring finger Ulnar nerve compression: Numbness in little finger and ulnar half of ring finger Radial nerve injury: Loss of sensation in anatomical snuffbox area
Visual Field Defects and Anatomical Correlations
Optic chiasm lesion: Bitemporal hemianopia Optic tract lesion: Homonymous hemianopia Meyer's loop lesion: "Pie in the sky" visual field defect
When you practice these clinical correlations through active recall rather than passive reading, you build the pattern recognition that Step 1 actually tests.
Advanced Recall Techniques for Complex Anatomy
Some anatomy topics resist simple mnemonics and require more sophisticated recall strategies.
Spatial Visualization for 3D Relationships
For structures like the Circle of Willis or brachial plexus organization, create mental 3D maps:
Circle of Willis: Visualize as a hexagon with specific artery positions. Practice "walking around" the circle mentally, naming each vessel and its territory. Brachial plexus: Build the tree from roots to terminal branches. Start with C5 and trace through upper trunk → divisions → cords → terminal nerves.
Embryological Pattern Recognition
Many Step 1 embryology questions follow predictable patterns. Focus on:
Neural tube defects: Spina bifida (incomplete vertebral arch closure) vs anencephaly (failure of neural tube closure) Heart development: Understand truncus arteriosus, tetralogy of Fallot patterns Kidney development: Metanephros → permanent kidney, mesonephros → temporary structure
Histology Integration with Gross Anatomy
Step 1 increasingly links histological features with anatomical structures:
Liver histology: Portal triad components (hepatic artery, portal vein, bile duct) with zonal liver organization Kidney histology: Glomerular filtration barrier components with nephron anatomy GI tract histology: Muscularis propria organization with enteric nervous system anatomy
Practice identifying these histological-anatomical correlations through anatomy questions that integrate both levels of organization.
Anatomy Study Schedule for USMLE Step 1
Here's a time-efficient approach that emphasizes high-yield topics:
Weeks 1-2: Neuroanatomy Foundation
Days 1-3: Brain anatomy, Circle of Willis, stroke syndromes
Days 4-6: Cranial nerves (functions, clinical correlations)
Days 7-10: Spinal cord organization, ascending/descending tracts
Days 11-14: Brainstem anatomy, cerebellar connections
Focus 70% of time on active recall through mnemonics and Probe Game rather than passive diagram review.
Weeks 3-4: Peripheral Nervous System
Days 15-18: Brachial plexus (comprehensive coverage)
Days 19-21: Lumbosacral plexus patterns
Days 22-25: Autonomic nervous system anatomy
Days 26-28: Integration and clinical correlation review
Weeks 5-6: Systems Integration
Days 29-32: Cardiovascular anatomy (high-yield areas)
Days 33-35: Respiratory anatomy and clinical correlations
Days 36-38: GI and GU anatomy (focus on innervation patterns)
Days 39-42: Comprehensive review and weak area reinforcement
Common Anatomy Mistakes on USMLE Step 1
Avoid these predictable errors that cost students points:
Confusing nerve root levels: C5-C6 vs C8-T1 brachial plexus injuries have different clinical presentations. Use clinical correlation mnemonics to distinguish them. Mixing up cranial nerve functions: CN VII has both motor (facial expression) and sensory (taste) functions. Questions often test the distinction between upper motor neuron vs lower motor neuron CN VII lesions. Incomplete Circle of Willis knowledge: Know not just the vessel names but their territorial distributions and clinical stroke syndromes. Ignoring bilateral vs unilateral patterns: Optic chiasm lesions cause bilateral visual field defects; optic tract lesions cause unilateral defects.
Frequently Asked Questions
How long should I spend on anatomy for USMLE Step 1?
Dedicate 15-20% of your total study time to anatomy, with 70% focused on neuroanatomy. For a 12-week dedicated study period, that means 2-2.5 weeks of concentrated anatomy review, followed by daily 15-minute recall sessions.
Should I use Anki flashcards or focus on active recall games?
Combine both. Use spaced repetition flashcards for basic fact retention (nerve roots, functions), then use active recall games like Probe to build rapid recognition under time pressure. The games mirror Step 1's clinical vignette style better than isolated flashcards.
Which anatomy atlas is best for USMLE Step 1?
Don't rely primarily on atlases. Step 1 tests functional anatomy and clinical correlations, not pure anatomical identification. Use atlases for initial visualization, then shift to clinical correlation resources and active recall practice.
How do I know if I'm ready for Step 1 anatomy questions?
Test yourself with timed clinical vignettes. If you can identify nerve lesions, stroke syndromes, and anatomical correlations within 90 seconds consistently, you're ready. Probe Game streak metrics provide objective feedback on your recall speed.
What's the most commonly missed anatomy topic on Step 1?
Brachial plexus nerve root injuries and their clinical presentations. Students often memorize the anatomy but can't translate it to clinical weakness patterns. Practice the clinical correlations, not just the anatomical organization.
Should I memorize every anatomical detail or focus on high-yield facts?
Focus on high-yield facts with strong clinical correlations. Step 1 doesn't test obscure anatomical details — it tests your ability to apply anatomical knowledge to clinical scenarios.
Prepare smarter with Oncourse AI — adaptive MCQs, spaced repetition, and AI explanations built for USMLE Step 1. Download free on Android and iOS.